Assorted Shaker Boxes
") At first glance a
traditionally-made Shaker box could scarcely seem more simple. Basically it consists of
four pieces of wood, some copper tacks, and some tiny wooden pegs. Anyone who has tried to
make them has probably learned that, simple though the concept may be, getting a perfect
result can take many tries.
At first glance a
traditionally-made Shaker box could scarcely seem more simple. Basically it consists of
four pieces of wood, some copper tacks, and some tiny wooden pegs. Anyone who has tried to
make them has probably learned that, simple though the concept may be, getting a perfect
result can take many tries.
A few years ago, Rick Scott of the East Tennessee Woodworkers Guild offered to give a class in basic boxmaking to interested members. I jumped at the chance to participate because of my long-standing interest in Shaker furniture and crafts. In the course each of the participants was given the opportunity to make a set of four nesting boxes. My first attempts are the four in the center of the picture above. The class convinced me to make more boxes in my own shop but, like so many things in my life, my good intentions took a long time to produce any results. I finally got up enough ambition to attempt to make boxes as Christmas gifts for 2005 and by September I started gearing up my shop for the job.
Boxmaking, in ridiculously simplified form:
- mark and trim the "swallow tail" fingers at one end of the top and bottom strips
- create a short taper at the opposite end of each strip
- drill tack holes at the appropriate places
- place the strips into boiling water
- after the strips have simmered for 20 minutes quickly remove the bottom strip and wrap it around a form
- holding the strip in the proper relationship remove from the form and tack the ends together by clinching the tacks on a cylindrical anvil
- place the tacked strip back on the form and wrap the top band around it and repeat the tacking/clinching step
- remove the bottom and top strips and place them on drying forms in the proper relationship to each other and dry for 48 hours
- mark the lid and bottom stock using a template and cut out on the scroll saw
- very carefully sand the edges of the top and bottom stock until it fits perfectly into the matching band
- fit the top and bottom into their bands and drill 6 to 12 holes through the band and into the stock to accomodate pegs
- pound in pegs then trim and sand them
- carefully sand all surfaces one last time
- apply finish
As I wrote, this is really a ridiculously simplified version of the steps. There are many intermediate tasks where one fiddles with the stock, inspecting, preparing, sanding, marking, trimming, tapering, feathering, fitting, and otherwise improving the product. One benefit of the many steps involved is that it is possible to get into a rhythm and almost convert the steps into a one-person assembly line.
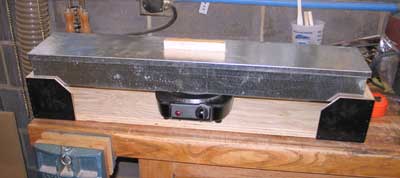 Having
the proper tools makes the job go more easily. One requirement is that one have a container
large enough to boil the strips. My first boxes were made in the most clumsy possible way
in that I was boiling the strips on the kitchen range, wrapping the form, running
downstairs to the shop, tacking, etc. A couple of days into the batch I got organized
enough to buy a hotplate and build a stand to balance the tray on the heater. This at least
allowed me to perform all the steps in the shop. This boiling tray, to which I added a
hinge, came from John Wilson.
Having
the proper tools makes the job go more easily. One requirement is that one have a container
large enough to boil the strips. My first boxes were made in the most clumsy possible way
in that I was boiling the strips on the kitchen range, wrapping the form, running
downstairs to the shop, tacking, etc. A couple of days into the batch I got organized
enough to buy a hotplate and build a stand to balance the tray on the heater. This at least
allowed me to perform all the steps in the shop. This boiling tray, to which I added a
hinge, came from John Wilson.
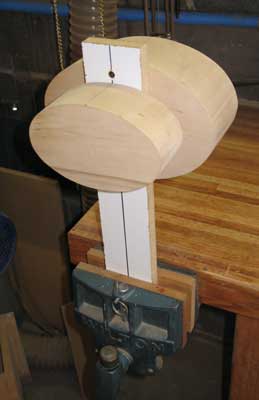 I finally
decided that having my bending forms, six in total, would be more easily handled if they
were solidly clamped rather than lying loose on the bench. I finally determined that having
them paired on a "stem" that allowed them to be clamped in the bench vise would be easiest
to manage. The line on the stem is important in that it is the reference for where the
"main" tack strip should fall.
I finally
decided that having my bending forms, six in total, would be more easily handled if they
were solidly clamped rather than lying loose on the bench. I finally determined that having
them paired on a "stem" that allowed them to be clamped in the bench vise would be easiest
to manage. The line on the stem is important in that it is the reference for where the
"main" tack strip should fall.
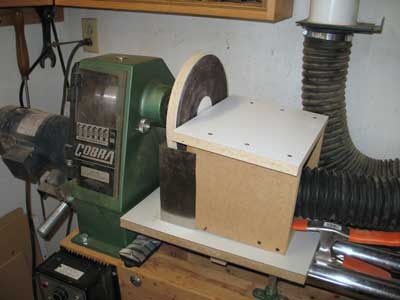 After
the bands are bent and dried the most difficult job is to trim the top and bottom stock so
that it fits absolutely perfectly within the bands. Even the smallest imaginable error here
essentially reduces the box to junk status because there is no hiding the gap. To make
fitting possible, the top and bottom stock are worked and sanded bit by bit sneaking up on
a proper fit. The edges are slightly tapered to allow a fit inside the band. Think of a
cork in a bottle and you'll understand. All of this sanding is easiest on a large
stationary sander, a tool I do not own and would have no space for in any case. I bodged my
way around this lack by creating a sanding disk for my lathe. The platform of the sander is
permanently tilted to obtain the proper edge taper. A sheetmetal shield keeps the dust from
flying and stuffing a collection hose under the platform grabs the largest portion of it.
After
the bands are bent and dried the most difficult job is to trim the top and bottom stock so
that it fits absolutely perfectly within the bands. Even the smallest imaginable error here
essentially reduces the box to junk status because there is no hiding the gap. To make
fitting possible, the top and bottom stock are worked and sanded bit by bit sneaking up on
a proper fit. The edges are slightly tapered to allow a fit inside the band. Think of a
cork in a bottle and you'll understand. All of this sanding is easiest on a large
stationary sander, a tool I do not own and would have no space for in any case. I bodged my
way around this lack by creating a sanding disk for my lathe. The platform of the sander is
permanently tilted to obtain the proper edge taper. A sheetmetal shield keeps the dust from
flying and stuffing a collection hose under the platform grabs the largest portion of it.
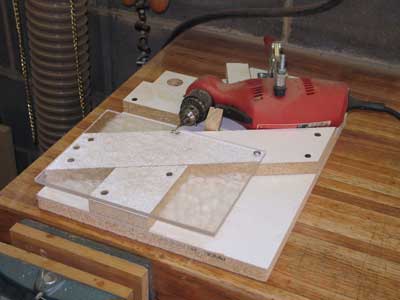 One
other fiddly bit in the process is drilling the tiny holes for the wooden pegs which join
bands to tops and bottoms. Because the top and bottom stock are thin there is no room for
error here. As in most cases it is possible to create a jig to make the job easier. I
clamped my right-angle drill into a carefully-dimensioned jig and then controlled the drill
via a footswitch allowing me to keep both hands on the work.
One
other fiddly bit in the process is drilling the tiny holes for the wooden pegs which join
bands to tops and bottoms. Because the top and bottom stock are thin there is no room for
error here. As in most cases it is possible to create a jig to make the job easier. I
clamped my right-angle drill into a carefully-dimensioned jig and then controlled the drill
via a footswitch allowing me to keep both hands on the work.
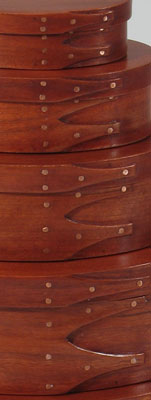 I had
problems, far more frequently than justifiable, with maintaining proper fit of tacklines.
These are especially important in making a box look right because of the adjacency of two
sets of lines and the lack of other visual references. If the main tackline of the top and
bottom do not line up perfectly (or at least very very closely) it will be
visible because there is really little else in the design to draw the eye away from the
mistake. I finally got closest to a proper fit by completing the bottom of each box up
through the pegging step before even attempting to match the top band and stock. This image
shows a set which came out just about perfectly. I won't show you the worst to avoid the
embarrassment.
I had
problems, far more frequently than justifiable, with maintaining proper fit of tacklines.
These are especially important in making a box look right because of the adjacency of two
sets of lines and the lack of other visual references. If the main tackline of the top and
bottom do not line up perfectly (or at least very very closely) it will be
visible because there is really little else in the design to draw the eye away from the
mistake. I finally got closest to a proper fit by completing the bottom of each box up
through the pegging step before even attempting to match the top band and stock. This image
shows a set which came out just about perfectly. I won't show you the worst to avoid the
embarrassment.
Materials for these boxes were varied but my favorite turned out to be cherry bands and quartersawn cherry tops and bottoms. I found that maple bands just weren't bending well enough and were tending toward splitting. Pine tops and bottoms worked beautifully but weren't all that attractive so they had to be painted. Finishes on these boxes were of various sorts. The brightly-colored ones were done with milk paint, one set (shown at the right) was colored with aniline dye, one set was artificially aged with a lye solution, one set received an attempted aging with ammonia fumes but the effect was ineffective because all I had was household ammonia rather than reagent-grade ammonium hydroxide. Some boxes combined paint and natural wood. All of the boxes received at least two coats of clear varnish and a good coat of wax. My favorite pattern proved to be the black and red which imitates a famous antique set. I made two sets of six in this style, giving the better set to my close neighbors and dear friends and keeping the lesser set for myself.
I should add that I obtained my materials from John Wilson, Boxmaker in Michigan. He offers everything a boxmaker might want beginning with classes, special tools and equipment, and perhaps most importantly, stock for bands and tops and bottoms. These materials are very critical and many shops are not equipped to prepare them even if good wood can be obtained. In particular the band material is best bought this way to avoid the waste that would inevitably occur if it was prepared with normal shop equipment. Additionally, John Wilson appears to be the sole remaining supplier of the the tiny copper tacks used in the boxes having bought the last two machines capable of making them from the Cross Company some years back when the company discontinued making them.
This website does not use cookies or javascript and collects no user information.